Smart lighting schedules and scenes transform your home into a responsive environment that adapts automatically to your daily routines, activities, and preferences. Rather than manually adjusting lights throughout the day, well-configured automations handle illumination changes seamlessly—waking you gently with simulated sunrise, brightening for focused work, dimming for movie nights, and ensuring security while you’re away. This comprehensive guide explains how to create effective lighting schedules, build custom scenes for every activity, and combine triggers for sophisticated automations that anticipate your needs.
I. Understanding Schedules vs Scenes
The distinction between schedules and scenes is fundamental to effective smart lighting automation. Understanding each concept helps you combine them for comprehensive lighting control that responds to both time and activity.
A. What Are Lighting Scenes?
A scene is a saved lighting configuration that can be activated instantly, setting multiple lights to specific brightness levels, colors, and color temperatures with a single command. Rather than adjusting each light individually when you want a particular atmosphere, you activate the scene and all lights transform simultaneously.
A “Movie Night” scene might dim living room overhead lights to 10%, set bias lighting behind the TV to deep blue at 20% brightness, and turn off kitchen and hallway lights entirely. Activating this single scene creates the entire cinema atmosphere without touching multiple app controls or speaking multiple voice commands.
Scenes are state definitions—they describe what lighting should look like for specific purposes. They don’t inherently include timing; they’re ready to activate whenever you want that particular atmosphere. Think of scenes as lighting presets you can call up instantly.
Most smart lighting platforms include pre-built scenes—”Energize” with cool, bright light for focus; “Relax” with warm, dim light for unwinding; “Concentrate” balancing brightness with warmth for sustained work. These starting points demonstrate scene concepts and often work well enough for immediate use, but custom scenes tailored to your specific fixtures and preferences provide superior results.
B. What Are Lighting Schedules?
A schedule automates scene activation or lighting adjustments at specific times without requiring your input. Schedules answer “when should this happen?” rather than “what should the lights look like?”
A simple schedule might turn on your front porch light at sunset and turn it off at sunrise—basic timer behavior. More sophisticated schedules activate different scenes throughout the day: “Morning” scene at 6:30 AM, transition to “Daytime” scene at 9:00 AM, shift to “Evening” scene at 6:00 PM, and “Night” scene at 10:00 PM.
Schedules can operate daily on identical timing, or vary by day of week (different weekend timing than weekday timing), or adjust dynamically based on sunrise/sunset times that change throughout the year.
The power of schedules lies in removing decisions from your daily routine. You don’t need to think about lighting adjustments when schedules handle transitions automatically. Well-designed schedules remain invisible during normal use—lights simply appear correct for the current situation without conscious attention.
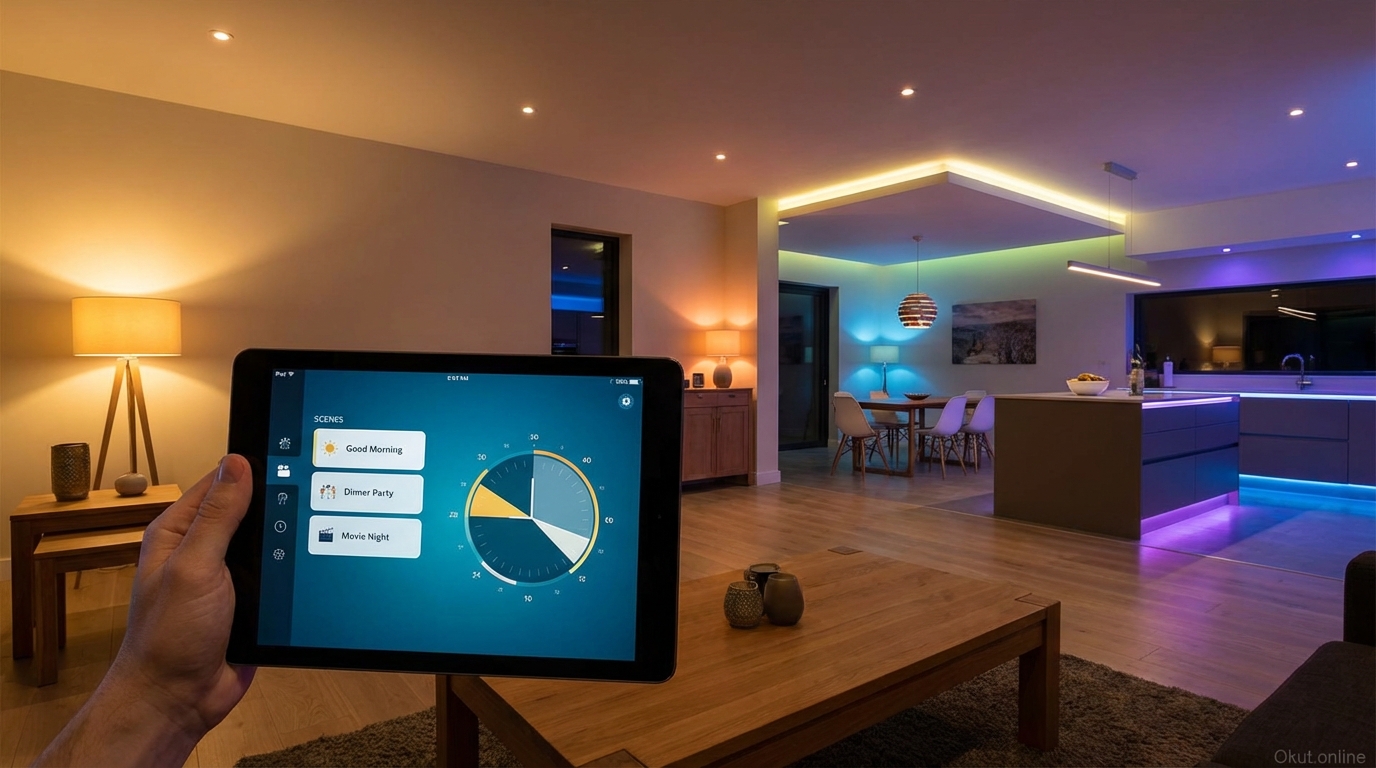
C. Combining Scenes and Schedules
Scenes and schedules work together for comprehensive lighting automation. Schedules activate scenes at appropriate times; scenes define what those activations produce. The combination handles routine lighting changes while keeping instant access to atmosphere adjustments available.
A typical implementation might include schedules that automatically activate appropriate scenes based on time of day, plus voice commands or switches that override to different scenes for specific activities. Scheduled morning brightness might be perfect for breakfast, but you speak “movie time” to activate the cinema scene when your schedule didn’t anticipate an afternoon movie.
The most effective smart lighting implementations think through typical daily patterns, create schedules handling normal routine, and prepare scenes for activities that occasionally interrupt routine. This approach automates the predictable while preserving flexibility for the variable.
II. Creating Effective Scenes
Scene creation starts with identifying activities and atmospheres, then translating those into specific lighting parameters across your fixtures. These practical approaches help you build scenes that genuinely improve daily lighting rather than just demonstrating technology.
A. Activity-Based Scene Design
The most useful scenes support specific activities rather than abstract moods. Consider what you actually do in each space and what lighting best serves those activities.
“Morning Routine” scene in bathrooms might set all lights to 50% brightness with 4000K neutral white—enough to see for grooming without the harsh blast of full brightness that makes early waking worse. The moderate intensity allows pupils to gradually adjust rather than shocking awakening eyes.
“Cooking” scene in kitchens sets task lighting over counters and stove to full brightness (100%) at 4000-5000K cool white for maximum visibility, while decorative lights dim to 30% warm ambient. The functional illumination serves food preparation; the ambient warmth maintains kitchen coziness.
“Reading” scene sets the reading corner lamp to 70% brightness at 3000K warm white—enough light for comfortable reading without eyestrain, warm enough to feel relaxing rather than institutional. Other room lights dim to 20-30% to reduce peripheral distraction.
“Gaming” scene for home offices or gaming rooms combines focused illumination on the desk/play area with bias lighting behind screens at complementary colors that reduce eye fatigue during extended sessions.
“Entertaining” scene for living and dining areas balances visibility for conversation and movement with flattering warmth that makes food and guests look their best. Overhead lights at 60% with 2700-3000K warmth, accent lighting highlighting architectural features or artwork, candle-like table lamps completing the atmosphere.
B. Time-of-Day Scene Sets
Creating scene sets for different times of day—morning, afternoon, evening, night—provides the foundation for schedule-driven automation.
Morning scenes (6-9 AM) should support waking and energizing activities. Start with cooler color temperatures (4000-5000K) that signal daytime to your circadian system. Brightness should be moderate initially, potentially increasing through the morning period. These scenes prioritize functional visibility and energy.
Daytime scenes (9 AM – 6 PM) can often remain at minimal artificial lighting if natural daylight is adequate, or provide neutral supplementation when natural light falls short. Smart automation can sense ambient light levels and increase artificial lighting only when needed, maximizing energy efficiency during naturally bright hours.
Evening scenes (6-10 PM) shift toward warmth that signals approaching rest. Color temperatures dropping to 2700-3000K support natural melatonin production as bedtime approaches. Brightness decreases from functional daytime levels to comfortable ambient levels that reduce stimulation while maintaining practical visibility.
Night scenes (10 PM onward) continue warmth and reduce brightness further. Areas other than where you’re actively present might switch off entirely. Any lighting needed for nighttime navigation—hallway nightlights, bathroom motion lights—should be minimally bright and maximally warm to avoid disrupting sleep patterns.
C. Scene Creation Across Platforms
The technical process of creating scenes varies by platform but follows similar patterns.
Philips Hue scene creation through the Hue app involves navigating to the room containing lights you want to include, tapping “Scenes” at the bottom, then “Create Scene.” Adjust each light to desired settings using the app’s controls, then save with a meaningful name. Alternatively, adjust lights physically to desired levels, then use “Create from current state” to capture whatever the lights are currently doing.
Google Home scene creation works through the Google Home app’s “Routines” function or through direct scene creation in room settings. Select the lights to include, set desired states, and name the scene. Google’s integration with various bulb brands means one scene can control lights from multiple manufacturers.
Amazon Alexa scene creation uses “Groups” (for same-brand devices) or “Routines” (for cross-brand or mixed device types). Create action sets that adjust all desired lights to specified states, triggered by voice commands, schedules, or other events.
Apple HomeKit scene creation through Apple’s Home app involves tapping the “+” button, selecting “Add Scene,” choosing included devices, setting each to desired states, and naming the scene. HomeKit scenes work with Siri voice activation and can be shared with family members through Home sharing.
III. Building Advanced Schedules
Basic schedules trigger actions at fixed times. Advanced scheduling incorporates day-of-week variations, sunset/sunrise adjustments, and conditional logic that creates truly intelligent automation.
A. Time-Based Schedule Fundamentals
Fixed-time schedules work well for routines that don’t vary regardless of season or daylight conditions.
Alarm-coordinated morning scenes should trigger 15-30 minutes before your typical wake time, beginning the simulated sunrise transition that makes waking more natural. If you wake at 7:00 AM, schedule begins at 6:30 AM with gradual brightening.
Bedtime preparation schedules might trigger at 9:00 PM, shifting common areas to warm, dim lighting that signals approaching sleep. The timing should precede your actual bedtime by 1-2 hours for maximum circadian benefit.
Nightlight activation for children’s rooms or hallway safety lighting typically triggers at bedtime (8:00 PM for children’s areas) and deactivates at wake time when brighter morning scenes replace navigation lighting.
Away-at-work schedules might turn off indoor lighting (why illuminate empty rooms?) or set minimal security lighting during typical absence hours (9:00 AM – 5:00 PM weekdays).
B. Sunrise/Sunset Dynamic Scheduling
Tying schedules to sunrise and sunset creates automations that adapt automatically to seasonal daylight variations without manual adjustment.
Exterior lighting scheduled for sunset activation turns on earlier in winter (4:30 PM) and later in summer (8:30 PM) without any intervention—the same schedule works correctly year-round. Similarly, sunrise-based deactivation ensures lights don’t waste power after dawn provides sufficient illumination.
Offset scheduling allows fine-tuning relative to astronomical events. “30 minutes before sunset” activates slightly before full darkness for safety; “1 hour after sunrise” might handle indoor morning scene transitions better than exact sunrise timing.
Interior lighting tied to sunset makes sense for spaces where natural daylight adequacy determines when artificial light becomes necessary. Living rooms might activate “Evening” scenes at sunset; kitchens might activate slightly earlier as cooking often begins before darkness.
Most smart home platforms offer sunset/sunrise scheduling natively. Location settings in your app determine your local sunset/sunrise times, which update daily throughout the year.
C. Day-of-Week Variations
Different daily schedules for weekdays versus weekends accommodate differing routines without forcing compromise.
Weekend wake times typically differ from weekday alarm schedules. Morning scenes configured for 6:30 AM weekday transitions would disrupt desired weekend sleep-ins if applied universally. Configure separate weekend schedules with later morning transitions—perhaps 8:30 or 9:00 AM.
Work-from-home days versus office days might use different daytime lighting. Days spent at home benefit from maintained comfortable lighting; days at the office might minimize lighting (empty house doesn’t need illumination).
Evening activities vary—movie nights, dinner parties, or early bedtimes for early flights create occasional needs beyond routine. Rather than complicating regular schedules, prepare scenes for these variations and activate them manually when needed.
D. Conditional and Presence-Based Automation
Advanced automation platforms enable schedules that consider conditions beyond simple time, responding to occupancy, weather, or other smart home data.
Occupancy-aware scheduling activates scenes only when someone is home. Evening lighting transitions make sense when the family is home; if everyone is out at a late dinner, there’s no need to activate living room scenes.
Weather-responsive lighting might increase brightness on overcast days when natural light falls short, or maintain dimmer settings when bright sunshine floods rooms. Smart home platforms with weather integration can include daylight conditions in scheduling logic.
Motion-triggered variations activate scenes when motion is detected in specific areas. Entering the kitchen might activate the “Cooking” scene during evening hours, automatically adapting to activity without voice commands or app interaction.
Security mode activation (vacation or away) might change scheduling entirely—simulating occupancy with pseudo-random lighting patterns that make the home appear lived-in rather than following predictable routines that absence would reveal.
IV. Platform-Specific Setup Guides
Each major smart home platform handles scheduling slightly differently. These practical guides help you implement effective schedules on your specific platform.
A. Philips Hue Schedules
The Hue app includes robust scheduling through the Automations section.
Access Automations by navigating to the “Automations” tab in the Hue app’s bottom navigation. Here you’ll find options for wake-up routines, go-to-sleep routines, custom timers, and home/away behaviors.
Wake Up automation schedules gradual brightening that simulates sunrise. Configure the room, target brightness and color temperature, duration of brightening transition (30 minutes is typical), and trigger time. The lights begin dim and warm, gradually increasing brightness and shifting toward cooler white to mimic natural sunrise progression.
Go to Sleep automation reverses the pattern, gradually dimming lights before a specified bedtime. The transition can extend 30-60 minutes, slowly reducing illumination as you complete evening routines until lights reach off-state.
Custom timers trigger scenes or specific lighting states at designated times. Create timers for each transition in your daily schedule—morning scene at 7:00, daytime at 9:00, evening at 6:00, night at 10:00.
Home and Away features use phone locations or Hue motion sensor data to determine occupancy, adjusting lighting behavior based on presence rather than fixed schedules.
Formulas in the Hue Labs section provide experimental automations including multi-room coordination, advanced presence logic, and notification-based triggers that extend beyond standard app capabilities.
B. Google Home Routines
Google Home implements scheduling through Routines that can include lighting among other smart home actions.
Access Routines through Google Home app’s Routines section (often under Automations or accessible from the home screen). Google provides starter routines for morning, bedtime, and other common scenarios.
Scheduled routines trigger at specified times. Set start times (with day-of-week selection), add lighting actions (scene activation, brightness/color changes), and the routine executes automatically. Multiple routines can cover different times throughout your day.
Voice-activated routines respond to custom phrases. “Hey Google, movie time” might dim all living room lights and set bias lighting—a scene activated by voice rather than schedule. These complement scheduled automation with on-demand scene access.
Household routines in Google Home can affect specific devices based on which member activates them, enabling personalized lighting that differs between family members using the same commands.
Sunrise/sunset scheduling is available for outdoor lighting routines; indoor routines typically use fixed times but can be combined with presence sensing through compatible devices.
C. Amazon Alexa Routines
Alexa’s Routines provide flexible automation that can include lighting alongside announcements, music, and other action types.
Access Routines through the Alexa app’s “More” menu, then “Routines.” Create new routines specifying triggers and actions.
Trigger options include schedules (time-based, with day selection and sunrise/sunset options), voice commands, device events (such as motion detection or door opening), and location-based triggers using phone geofencing.
Actions for lighting include controlling specific devices, activating groups, or triggering scenes created in device-specific apps (like Hue scenes). Combine lighting with Alexa announcements (“Good morning, the lights are on and it’s 65 degrees outside”).
Wait actions between steps create sequenced automations. A bedtime routine might announce the time, wait 1 minute, dim lights to 50%, wait 15 minutes, and turn lights off—guiding you through bedtime preparation.
Location-based triggers (with permission) activate routines when you arrive home or leave. Arriving home after work might trigger “Welcome Home” lighting; leaving in the morning might trigger “Away” mode.
D. Apple HomeKit Automations
HomeKit automations through the Home app create schedule and trigger-based lighting control within Apple’s ecosystem.
Access Automations through the Home app’s Automation tab. Create new automations with various trigger types and action configurations.
Time-based automations trigger at specified times, with options for specific days and sunset/sunrise timing with offsets. Enable “Run Only When Someone Is Home” or “Run Only When No One Is Home” for occupancy-aware scheduling.
Sensor-based automations trigger when HomeKit sensors detect motion, door opening/closing, or other events. Motion in the bathroom at night might activate nightlight-level illumination; no motion for 10 minutes might deactivate.
Arriving/Leaving automations use iPhone locations to trigger lighting when household members arrive or depart. First person arriving triggers “Welcome” lighting; last person leaving triggers “Away” mode.
Scene integration allows automations to activate HomeKit scenes rather than individual device commands, simplifying configuration for complex multi-device states.
Shortcuts integration extends automation capabilities significantly. Advanced users can create Shortcuts with complex logic (weather conditions, calendar events, etc.) that trigger lighting changes, running those Shortcuts from HomeKit automations.
V. Circadian Rhythm Optimization
Aligning lighting with natural circadian patterns supports better sleep, improved energy, and overall health benefits beyond simple convenience or aesthetics.
A. Understanding Circadian Impact
Light profoundly affects your circadian rhythm—the internal clock governing sleep-wake cycles, hormone production, and numerous physiological processes. Your body evolved expecting bright, blue-enriched light during daytime (sunlight) and darkness at night. Modern artificial lighting disrupts these expectations, and smart lighting can either worsen or improve the situation.
Blue light wavelengths (found in cool white LEDs and screens) suppress melatonin production, the hormone signaling sleep readiness. Exposure to blue-rich light in evening hours delays melatonin production, making falling asleep more difficult and reducing sleep quality even when you eventually sleep.
Morning light exposure with blue-enriched wavelengths signals wakefulness, suppressing remaining melatonin and initiating cortisol patterns that support alertness. Insufficient bright morning light leaves you groggy and delays full alertness.
Smart lighting can deliver appropriate light at appropriate times—cool, bright light in morning and daytime for energy; warm, dim light in evening for rest preparation. This alignment supports natural circadian function rather than fighting against biological expectations.
B. Circadian-Optimized Schedule Design
A circadian-optimized lighting schedule might follow patterns like these, adjusted for your specific schedule.
6:00-6:30 AM: Gradual wake-up transition from darkness or minimal red light to moderate brightness (50-70%) at 3500-4000K. The transition mimics dawn, signaling wakefulness gently.
7:00-9:00 AM: Full brightness (80-100%) at 4500-5000K or higher. This is when maximum alertness is beneficial; cool, bright light supports that goal.
9:00 AM – 5:00 PM: Maintain cool, bright conditions during work hours if indoors, or supplement natural light to maintain adequate illumination. If possible, maximize natural light exposure during these hours—health benefits extend beyond circadian rhythm to vitamin D production and other factors.
5:00-7:00 PM: Begin transition toward warmer temperatures (4000K shifting toward 3000K). Brightness can remain moderate for practical activity but warmth increases.
7:00-9:00 PM: Shift to warm lighting only (2700-3000K) at reduced brightness (40-60%). This signals evening to your circadian system while maintaining functional illumination for evening activities.
9:00 PM – Bedtime: Further reduce brightness (20-40%) and maintain warmth or shift even warmer (2200K if available). Minimize screen usage or use night modes on devices. Prepare physiologically for sleep.
Bedtime – Wake: Darkness for sleep, with minimal warm lighting if nighttime navigation occurs (bathroom visits, etc.). Any necessary lighting should be dim and red-shifted to minimize circadian disruption.
C. Tunable White Implementation
Most smart bulb platforms support color temperature scheduling that automates circadian-appropriate white settings throughout the day.
Philips Hue includes “Natural Light” formulas that automatically adjust color temperature based on time of day, using your location’s sunrise/sunset data to create gradual transitions throughout daylight hours.
LIFX Day & Dusk scheduling automatically shifts color temperature on a schedule you define, transitioning from cool morning light through warm evening without manual intervention.
Third-party apps like Circadian Daylight for Home Assistant or Adaptive Lighting for various platforms provide sophisticated circadian automation that calculates optimal color temperatures based on astronomical data and adjusts continuously rather than in steps.
Even simple automation works well. A schedule activating “Cool Morning” scene (5000K) at 7 AM, “Neutral Daytime” (4000K) at 10 AM, “Warm Evening” (3000K) at 6 PM, and “Night” (2700K) at 9 PM covers basic circadian needs without complex continuous adjustment.
VI. Security and Away Mode Lighting
Smart lighting enhances home security through occupied appearance simulation, motion-activated deterrence, and integration with security systems.
A. Occupied Appearance Simulation
When you’re away from home, lighting that suggests occupancy deters burglars who target obviously empty properties.
Random-seeming patterns prevent the “lights on a timer” predictability that sophisticated criminals recognize. Rather than lights on at 6 PM and off at 11 PM every day, vary timing slightly and include different rooms at different times.
Philips Hue Away Mode simulates natural lighting patterns based on your recent usage, randomly selecting rooms and timing that mirrors how you actually use lighting. The simulation is convincing because it’s based on your real habits rather than generic patterns.
Platform automation can create similar effects: trigger random rooms at random intervals during evening hours when you’re typically home, mimicking natural behavior patterns.
TV simulation—specifically Hue’s Sync Box or dedicated TV simulator devices—creates flickering light patterns that convincingly suggest someone watching television, one of the most common evening activities that would indicate presence.
Multi-floor simulation is important for multi-story homes. Lights only on the first floor all evening, then suddenly all off simultaneously, looks unnatural. Occasional second-floor lights, bathroom lighting cycles, and gradual turn-off patterns look more realistic.
B. Motion-Reactive Security Lighting
Motion-triggered lighting serves both convenience and security, illuminating when activity occurs while startling potential intruders who expected darkness.
Exterior motion lighting should cover approach paths, entry points, and areas where intruders might attempt concealment. Motion detection triggers full-brightness illumination, deterring through visibility and capturing better security camera footage.
Interior motion at unexpected times can trigger alerts. Motion detected while you’re away might activate all lights in and around the motion area, potentially scaring off intruders while capturing their presence on cameras activated simultaneously.
Integration with security systems creates coordinated responses. Motion triggers lights, starts recording, sends alerts, and potentially activates sirens—a comprehensive response that combines deterrence with evidence capture.
C. Integration with Alarm Systems
Smart lighting can participate in alarm response and status indication, extending security system functionality.
Alarm activation lighting might flash all connected lights when alarms trigger, creating unmistakable alert that something is wrong—visible to neighbors and terrifying to intruders who suddenly find themselves brightly illuminated.
Entry delay indication uses light color to show arm/disarm state. Green when disarmed, yellow during entry delay countdown, red when armed—visible confirmation of system state without finding the keypad.
Notification lighting provides subtle status for important events. A light briefly flashing when someone arrives home, color changing to indicate weather alerts, or brightness shifting to remind of calendar events—smart home integration extends lighting beyond simple illumination into ambient information display.
VII. Common Mistakes to Avoid
- Too Many Manual Adjustments: If you’re constantly overriding scheduled automations or manually adjusting scene settings, your automation isn’t serving you well. Refine schedules and scenes until manual intervention becomes rare rather than routine.
- Forgetting About Guests: Sophisticated automations that require app access or voice commands may frustrate guests who can’t control lighting in your home. Ensure wall switches remain functional (smart switches help), or provide simple instructions for common needs.
- Ignoring Physical Switches: Automations fail when someone toggles a physical switch that cuts power to smart bulbs. Use switch covers, smart switches, or family education to prevent switch-based automation breaks.
- Overcomplicating Initial Setup: Start with simple schedules (morning, evening, night) and essential scenes (movie, reading). Add complexity as you learn what you actually want, rather than building elaborate automation upfront that doesn’t match your actual living patterns.
- Not Testing at Different Times: Schedules that look correct in app configuration may behave unexpectedly in practice. Test automations at each scheduled time to verify they produce expected results.
- Neglecting Updates: Schedule needs change as seasons shift, work schedules evolve, or household composition changes. Review and update automations periodically—at least seasonally—to ensure they still match your current life.
VIII. Practical Tips for Schedule Success
- Start with Problem Moments: Identify specific frustrating moments—”I always forget to turn off the porch light,” “the kitchen is dark when I start cooking”—and create targeted automations for these. Solving specific problems provides more satisfaction than comprehensive automation for its own sake.
- Use Sunrise/Sunset for Outdoor Lights: This single automation eliminates seasonal adjustment entirely. Outdoor lights working correctly year-round without any attention provides exceptional value for minimal setup.
- Create Transition Scenes: Abrupt lighting changes jar; gradual transitions feel natural. Build transition time into scene activations—15-30 seconds for minor changes, 20-30 minutes for circadian-based progressive shifts.
- Label Everything Clearly: “Scene 1,” “Scene 2,” “Living Room 3″ are meaningless labels. Use descriptive names that make voice activation natural and app navigation intuitive—”Movie Night,” “Sunday Morning,” “Working Late.”
- Keep Physical Backup: Always maintain a way to control critical lighting without app or voice access. Smart switches that work when pressed manually, or at least one lamp per room on a non-automated switch, ensure lighting access during technical problems.
- Share Configuration with Household: Everyone in your household should understand how to activate common scenes and what the scheduled automations do. Shared understanding prevents family members from fighting against automation they don’t expect or understand.
IX. Conclusion
Smart lighting schedules and scenes transform your home into an environment that adapts to your life rather than requiring constant attention and adjustment. Scenes provide instant atmosphere changes for activities from movie watching to focused work; schedules ensure appropriate lighting happens automatically whether you remember to adjust it or not. Circadian-optimized automation supports better sleep and daily energy; security automation enhances home protection during your absence. Start with essential scenes for your most common activities and simple schedules for predictable daily transitions, then expand as you learn what your life actually needs. Well-implemented smart lighting automation remains invisible during normal use—lights simply appear correct for the current moment, every moment, without thought.
What lighting moments in your day would benefit most from automation? What scenes would you create for your specific activities and spaces? Share your ideas in the comments!